Mirror: Innocent World Hair Styling Tutorials
Innocent World Shinjuku was posting a bunch of hair styling tutorials in 2020/2021, but then they deleted their twitter when they closed the physical store, which is super sad because a lot of the tutorials were great, and they are very, very hard to find in the wayback machine unless you have the exact URL of a specific tweet. Here is a baker’s dozen that I’ve been able to scrounge up from references to them around the web. I did not make any of these, I’m just re-posting the content that was created by Innocent World Shinjuku shop and loosely translating it. Translation is only for convenience, and may contain errors.
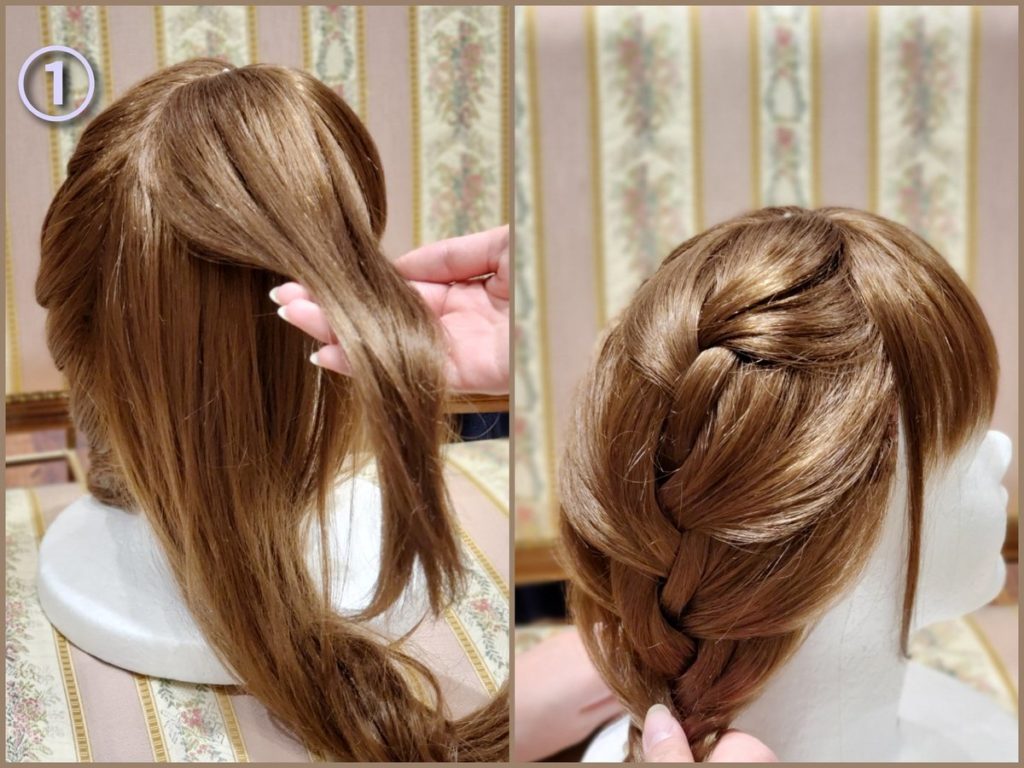
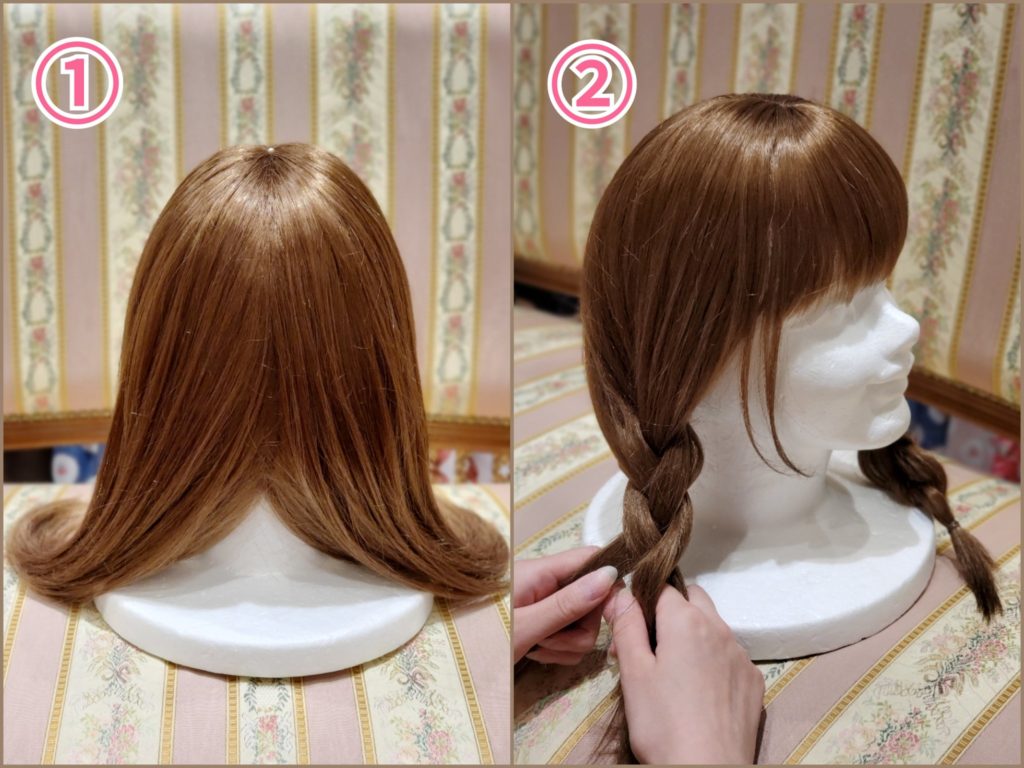
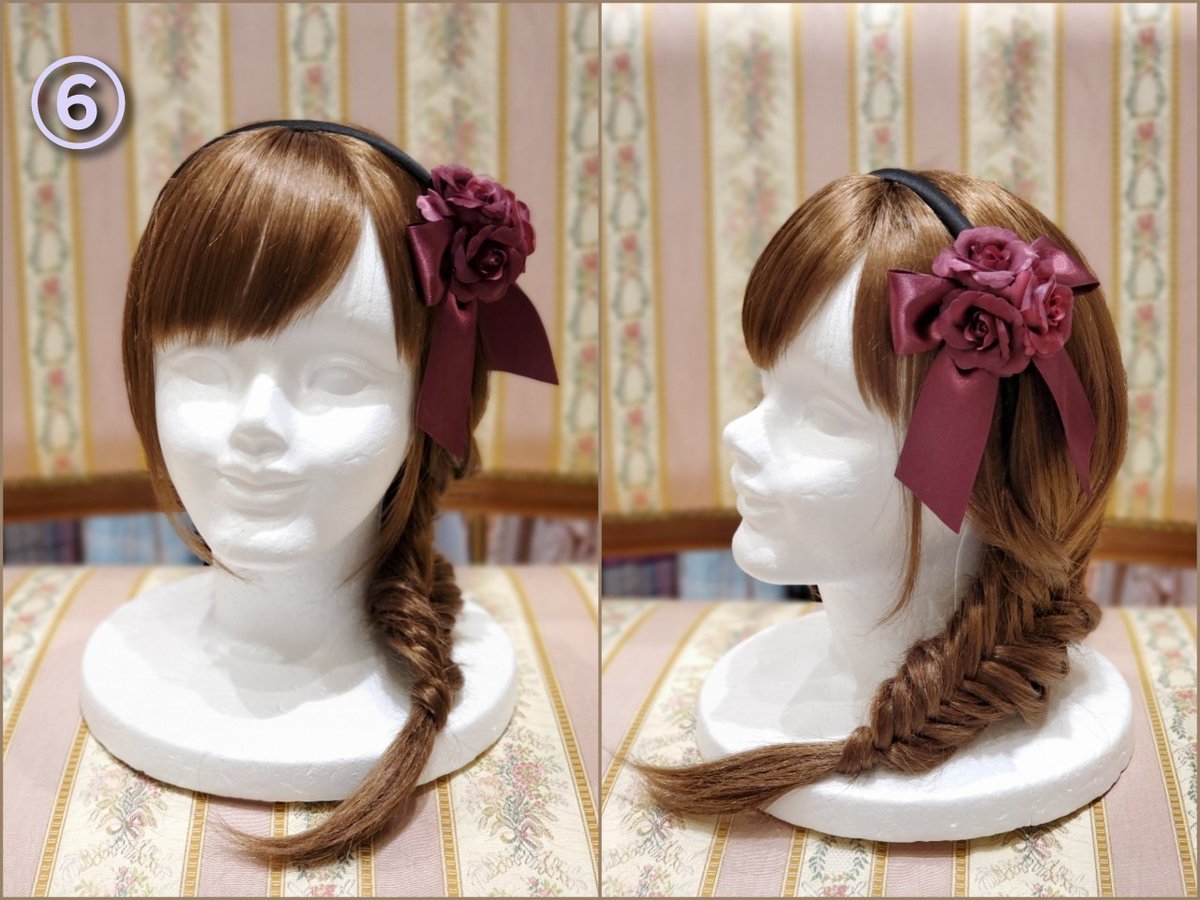
Style #1: Simple Braid and Fishbone Braid Combo Style


編込みとフィッシュボーン(詳しくはhttps://bit.ly/34Rs1BZ )を組合わせた簡単アレンジです
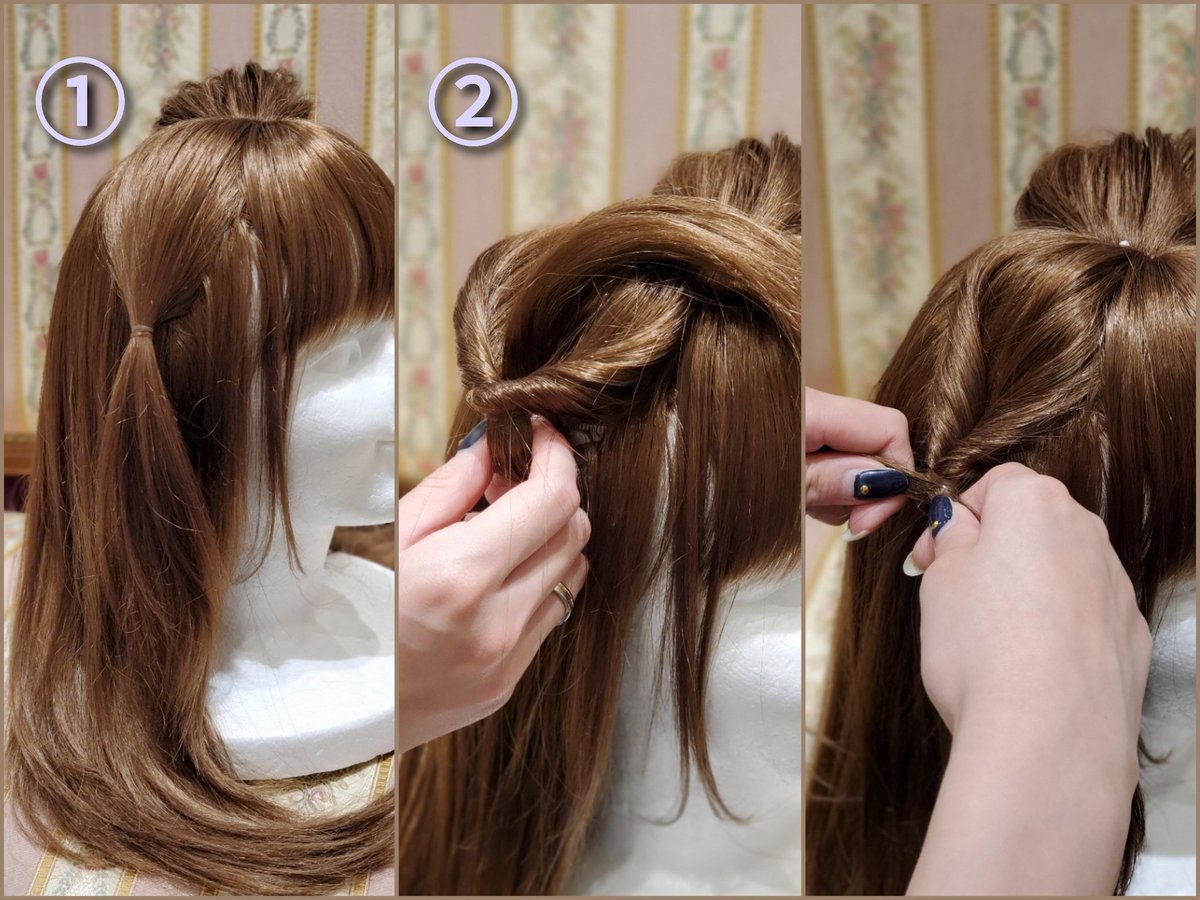
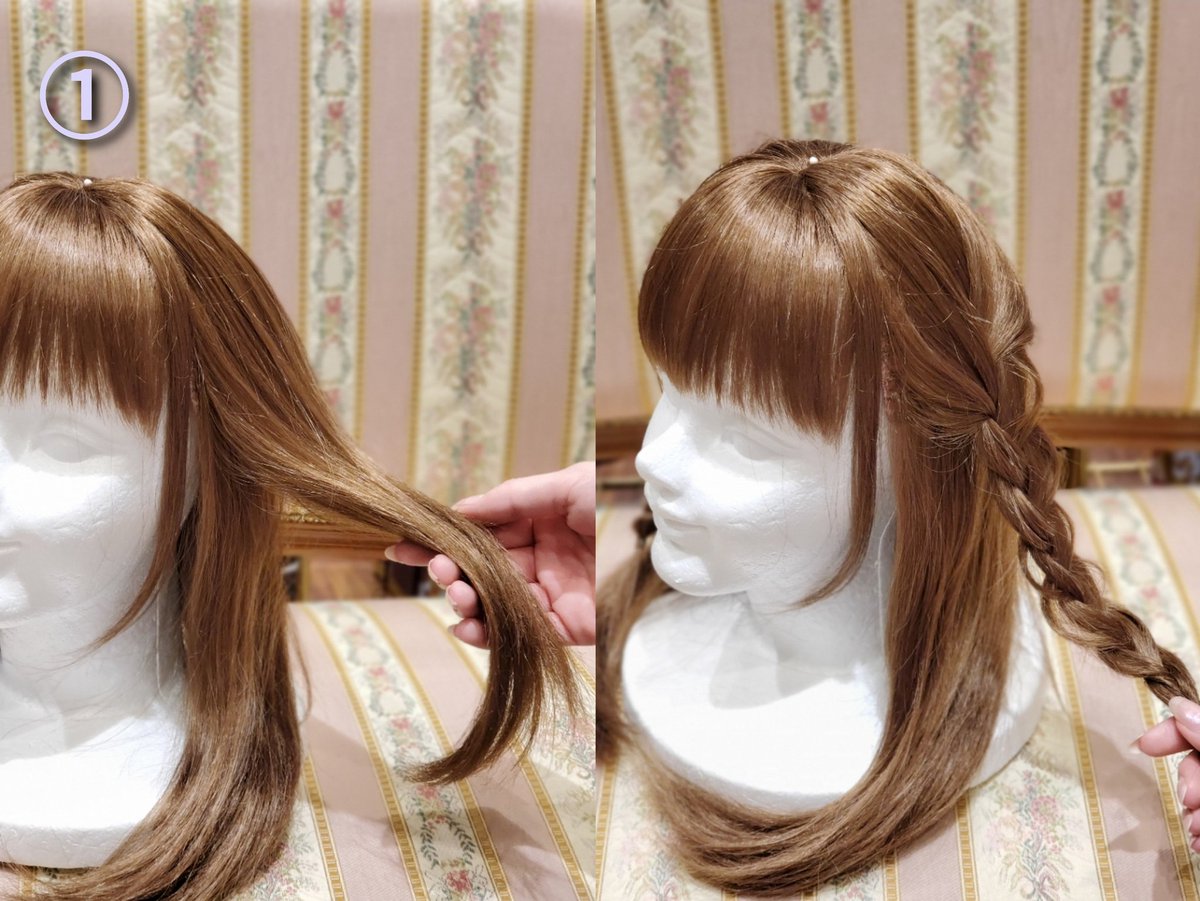
①全体を2つに分け耳下までゆるく編込みする
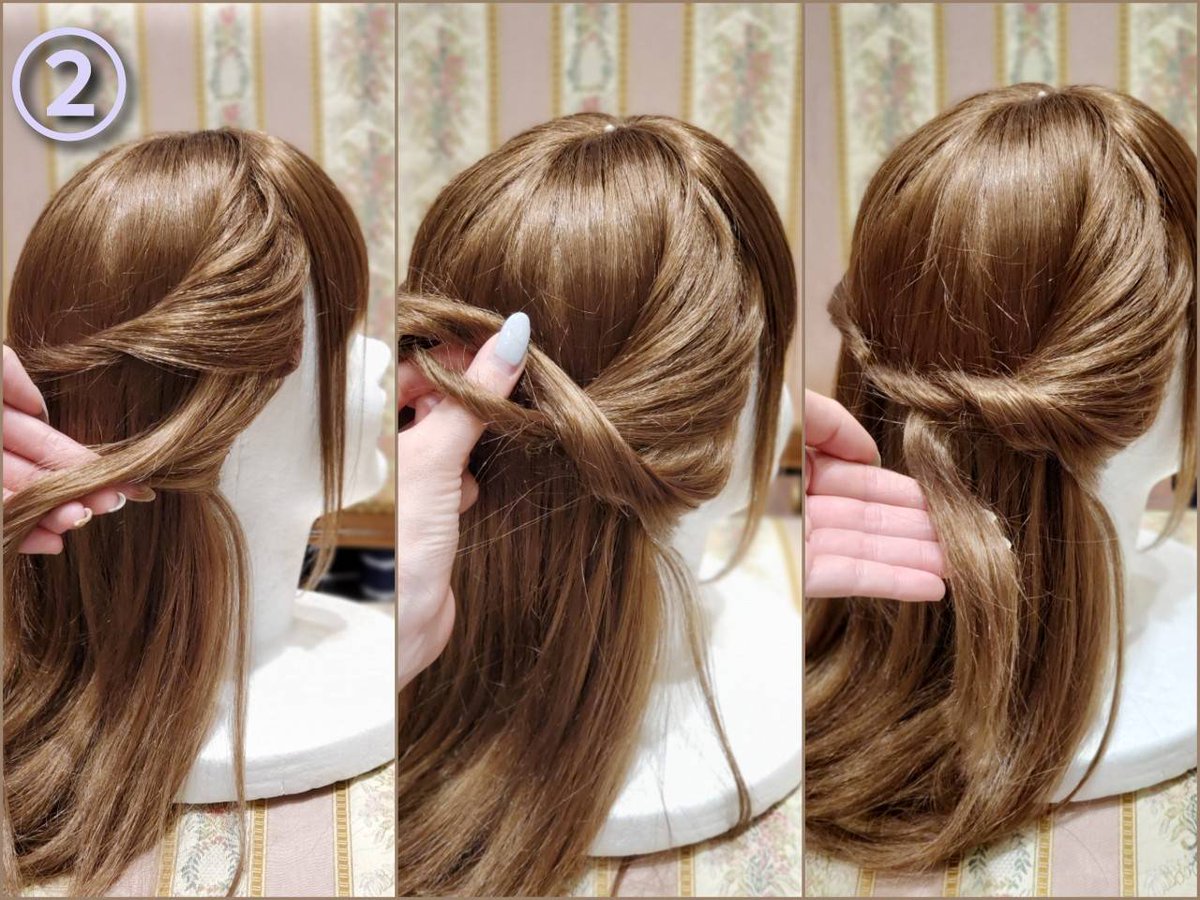
②毛先を2つに分けフィッシュボーンをつくる
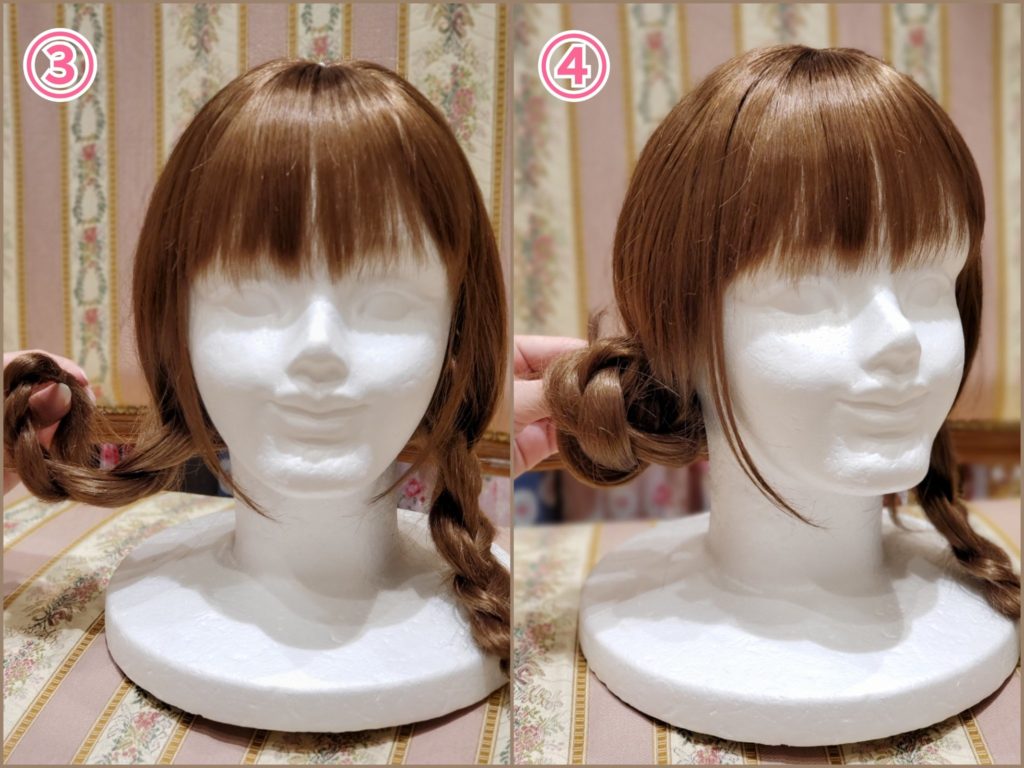
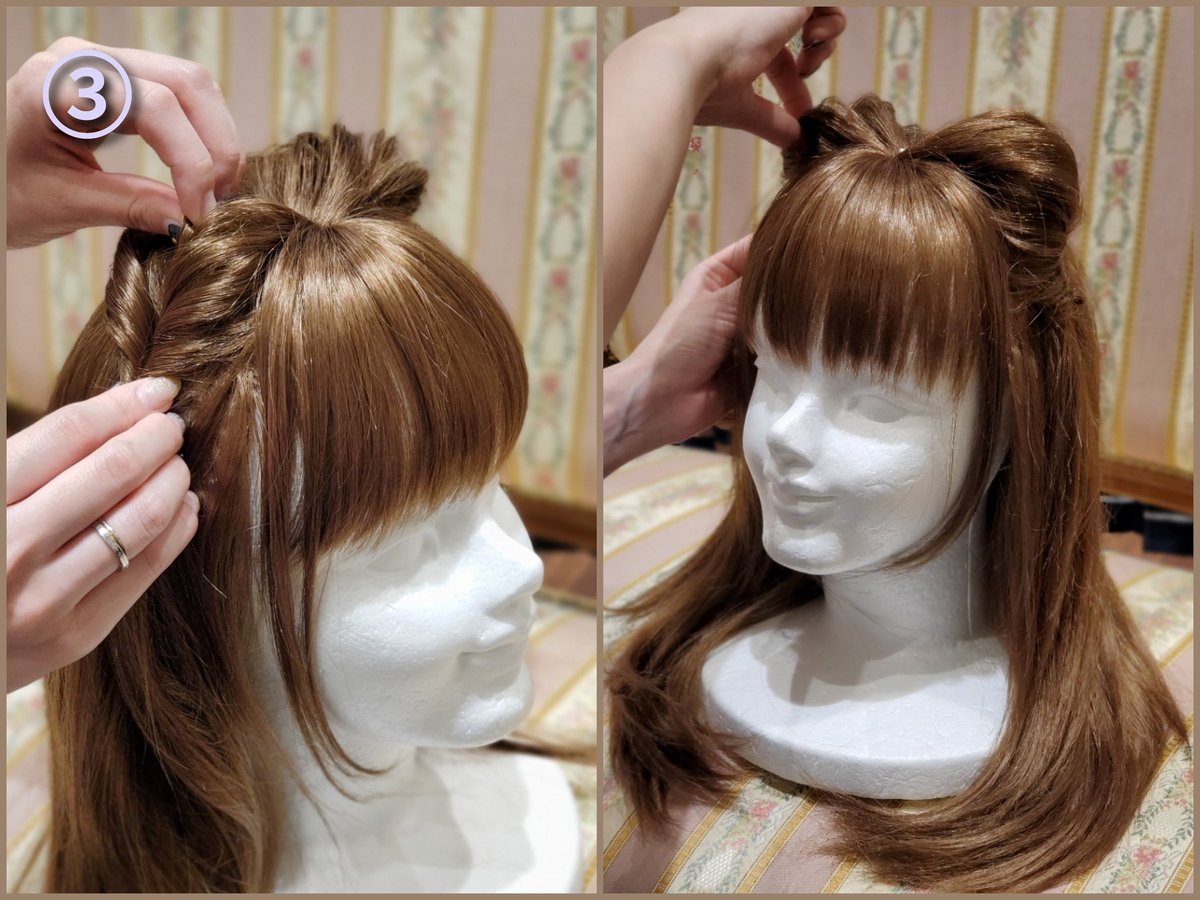
③反対側も同じようにし、全体をほぐし整える
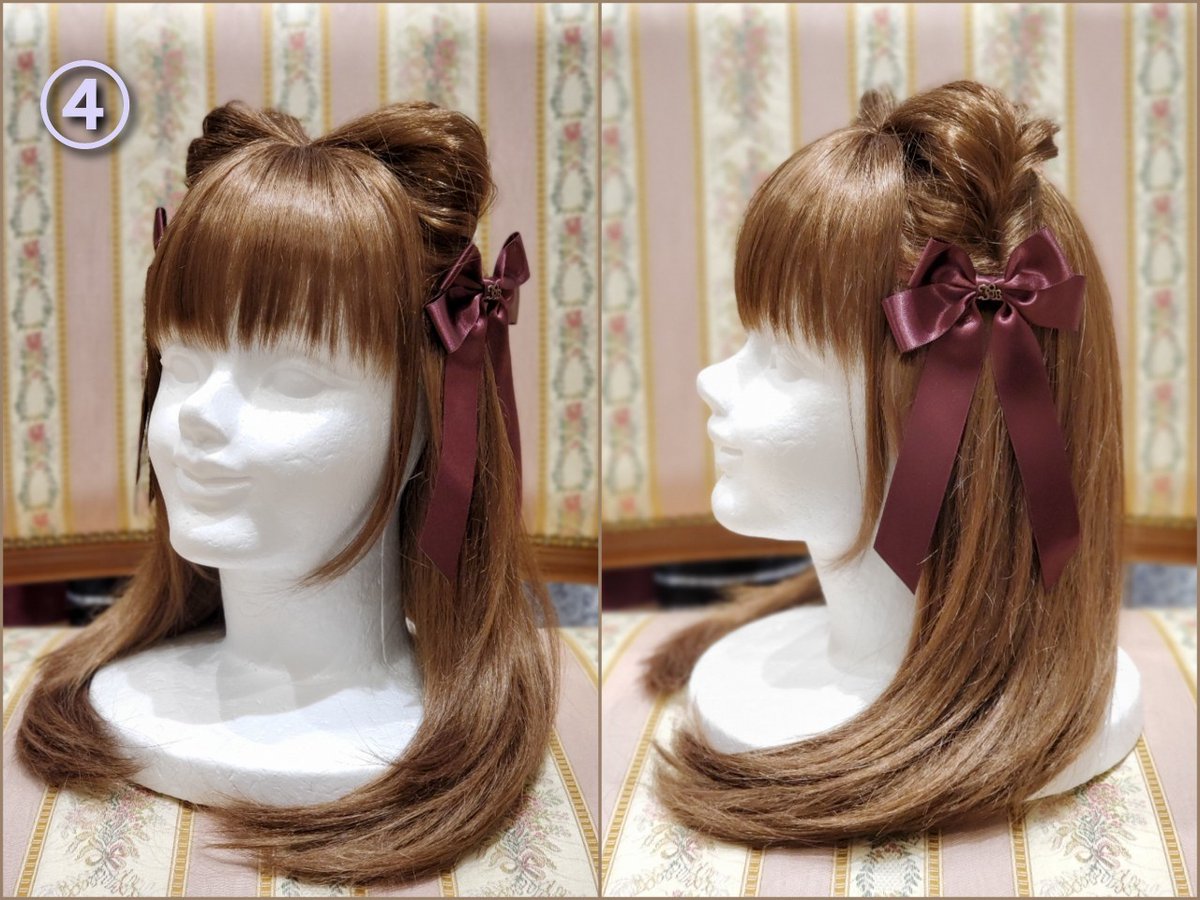
毛先や編込みにリボンを付けて完成
It is a simple arrangement that combines braid and fishbone braid (for details▶https://bit.ly/34Rs1BZ)
① Divide the whole into two and braid loosely up to the ears
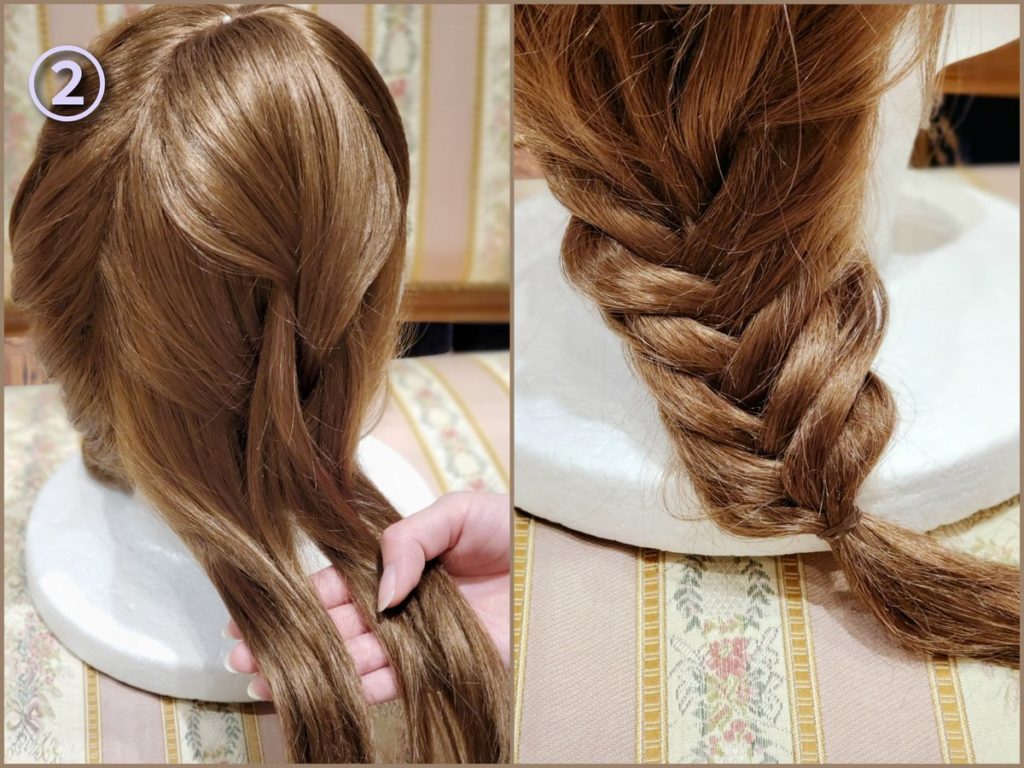
② Divide the tip of the hair into two and make a fishbone
③ Do the same on the other side, loosen and arrange the whole
Completed with a ribbon attached to the ends of the hair and the braided hair
Style #2: Good for Canotiers!
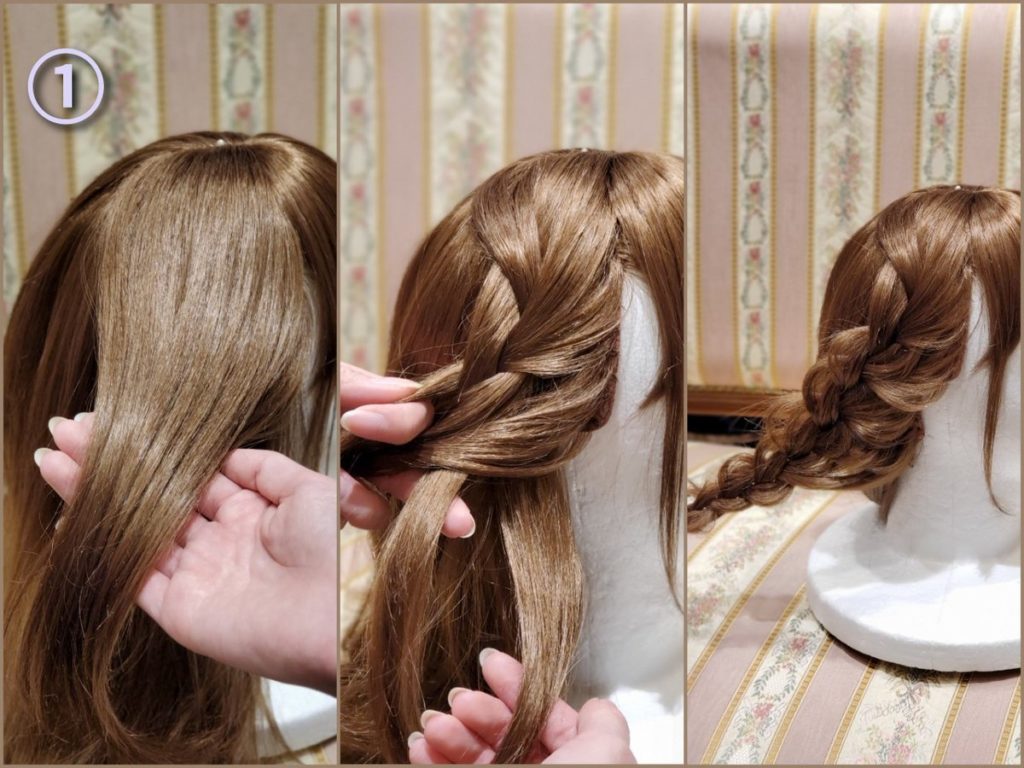
①片側の毛を少し取り、下の毛をすくいながら後ろに向かって三つ編み
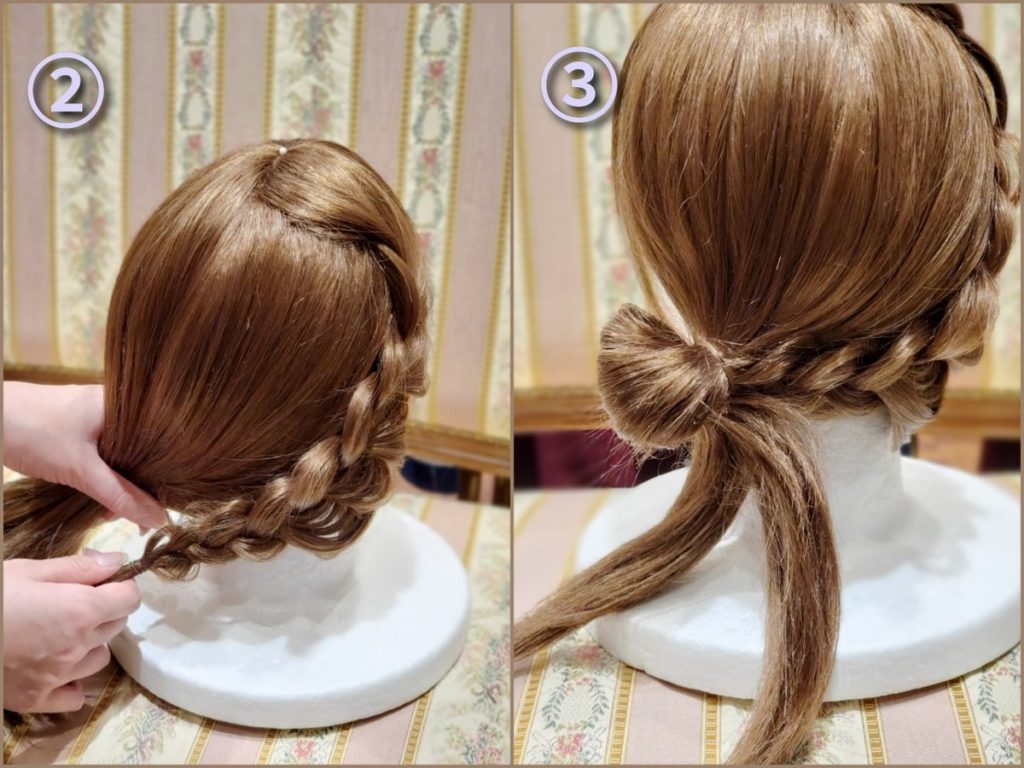
②残りの毛束と合わせる
③ ②を結ぶ時お団子状にし、毛先を2つに分ける
④残った毛をねじり、交差させてお団子に巻き付ける
⑤ヘアピンを使ってお団子の形を整える 丸型コームを付けて完成
① Take a little hair on one side and braid it backwards while scooping the hair on the bottom
② Combine with the rest of the hair bundle
③ When you tie ②, make a bun and divide the ends of your hair into two.
④ Twist the remaining hair, cross it and wrap it around the dumpling
⑤ Adjust the shape of the dumpling using a hairpin Complete with a round comb
Style #3: Easy Half-up with Double Twists


2重くるりんぱで簡単ハーフアップ
①サイドを多めに残し後ろをゴムで結び上から下へくるりんぱ
②サイドを①と同じ高さで結び上から下へ2回くるりんぱ
③ ①②を全体的にほぐしてあげるとふんわりとして可愛いですよ
①Tie the back with a rubber band, leaving the sides a little longer, and roll from top to bottom
② Tie the side at the same height as ① and wrap it twice from top to bottom
③ If you loosen ①② as a whole, it will be fluffy and cute
Style #4


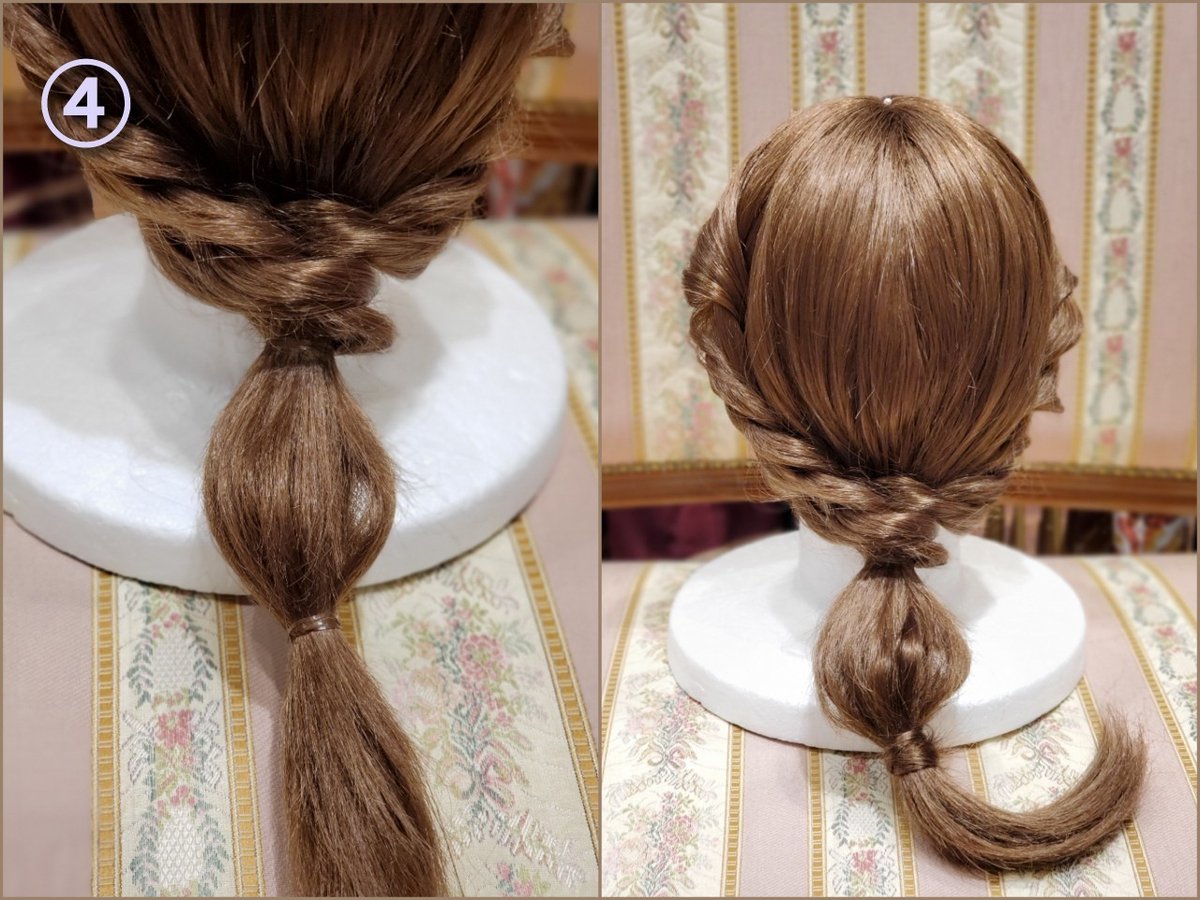
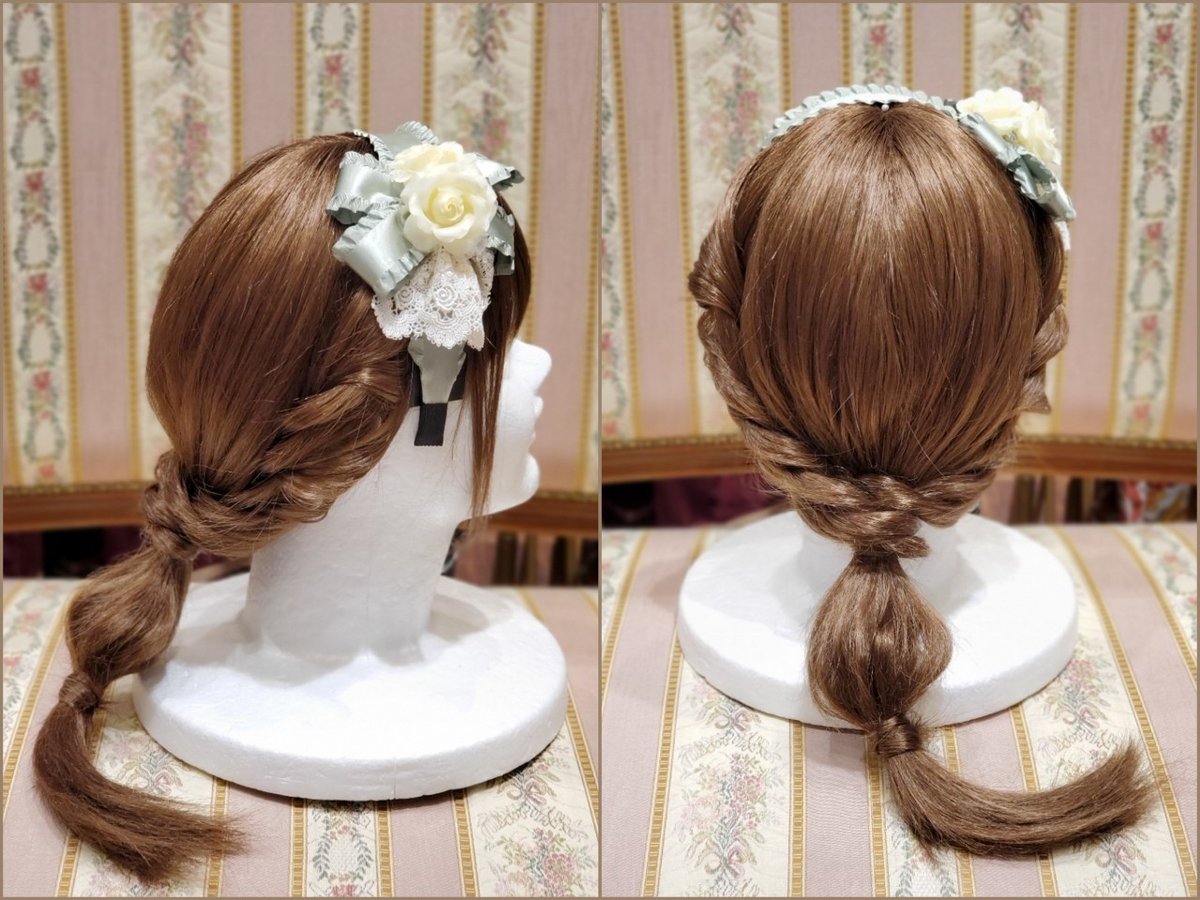
①サイドを多めに取り残りを下で結ぶ
②サイドを下の毛と一緒にすくいロープ編みする
③反対もできたら毛束を交差させ毛先を①の毛束の後ろに回し①②を一緒に結ぶ
④ ③の下でもう一度結び玉ねぎヘアになる用にゴムとゴムの間の毛束を引っ張り丸くなるように整える
①Take a lot of sides and tie the rest at the bottom
② Rope braid the side together with the hair below
③ If you can do the opposite, cross the hair bundles and turn the hair ends behind the hair bundle of ① and tie ① and ② together.
④ Pull the bundle of hair between the elastics to make it look like an onion hair tied again under ③ and arrange it so that it becomes a ball
Style #5: The Easy Twin Tail


連続でくるりんぱするだけ
簡単ツインテールのご紹介です
①2つに結ぶ
②上から下へくるりんぱ
③少し下をゴムで結びくるりんぱ
④ ②、③を繰り返す
⑥ヘッドドレスやリボンを付けて完成
使用アイテム ローズバスケットヘッドドレス IWチャームツインリボンクリップ
① Tie in two
② Bring the pony tail back through the center of it’s self from top to bottom
③ secure with a little hair band
④ Repeat ② and ③ down each pigtail
⑥ Complete with a headdress and ribbon
Items used:
Rose basket headdress
IW charm twin ribbon clip
Style #6: A Simple Bun That is Perfect for Hats


ヘアアレンジのご紹介
今回はハットにぴったりな簡単お団子ヘアをご紹介致します
①全体を2つに分ける
②それぞれを緩く三つ編みする
③毛先から内側に巻く
④巻き終わりをピンでとめる
⑤もう片方も同じようにまとめる
⑥帽子を被って完成
使用アイテム サテンフリルリボンローズハット
① Divide the whole into two
② Loosely braid each side
③ Wrap inward from the tip of the hair
④ Pin the end of the wound bun
⑤ Put the other side together in the same way.
⑥ Complete with a hat
Style #7: A Simple Style that Looks Elaborate


①全体を3等分に分ける
②真ん中は三つ編み、両サイドはロープ編みをする
③3本編んだ状態(ロープ編みはクリップ等で止めておくのがお勧めです)
④出来た三本で更に三つ編みをする
⑤ゴムでとめる
⑥リボンを付けて完成
① Divide the whole into 3 equal parts
② Braid in the middle and rope braid on both sides
③ 3 braids state (It is recommended to stop the rope braids with a clip.)
④ Make a big braid with the three pieces
⑤ Fasten with hair band
⑥ Complete with a ribbon
Style #8: The Side Fishbone Braid

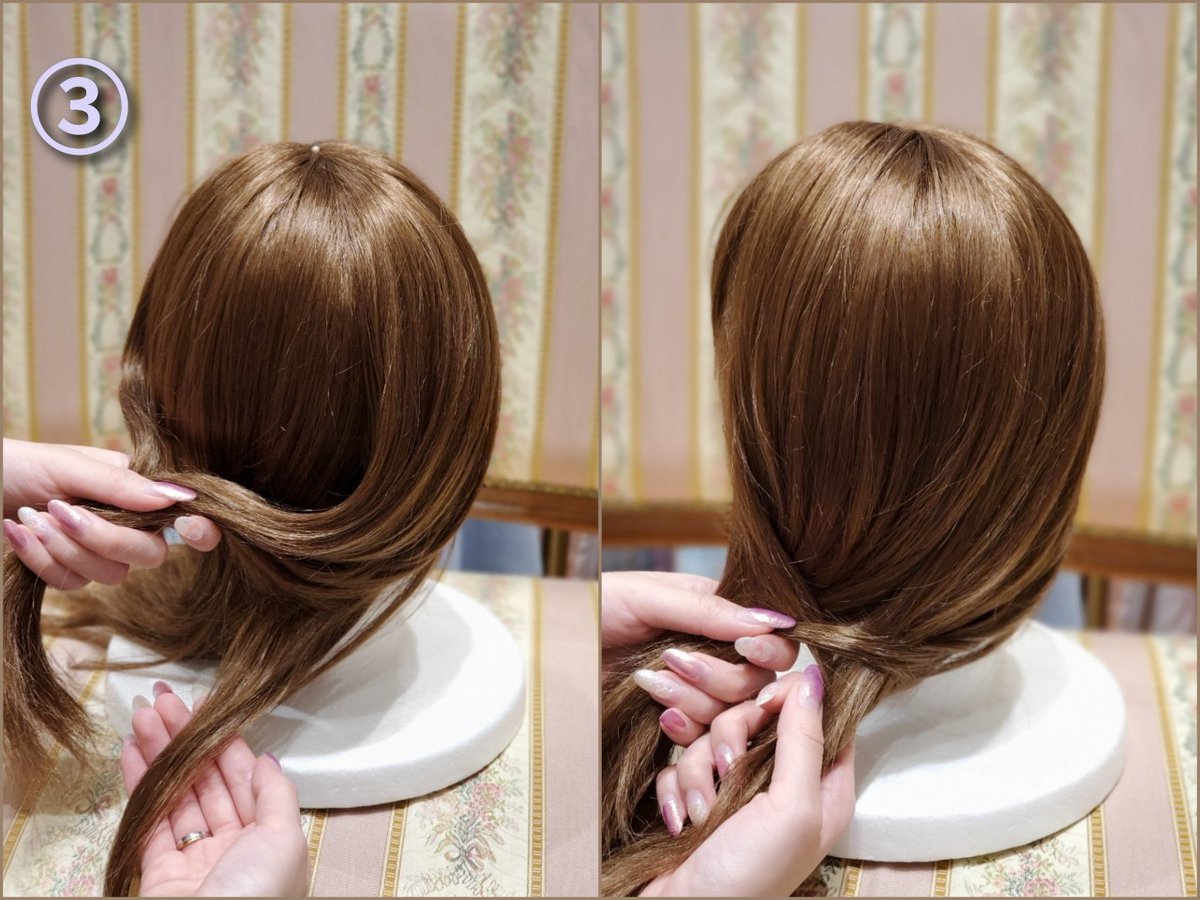
1度覚えれば意外と簡単
サイドフィッシュボーンのご紹介です
①片方に流し半分に分ける
②左の毛束を少しとり右の毛束に合わせる
③同じく右の毛束を少しとり左の毛束に合わせる
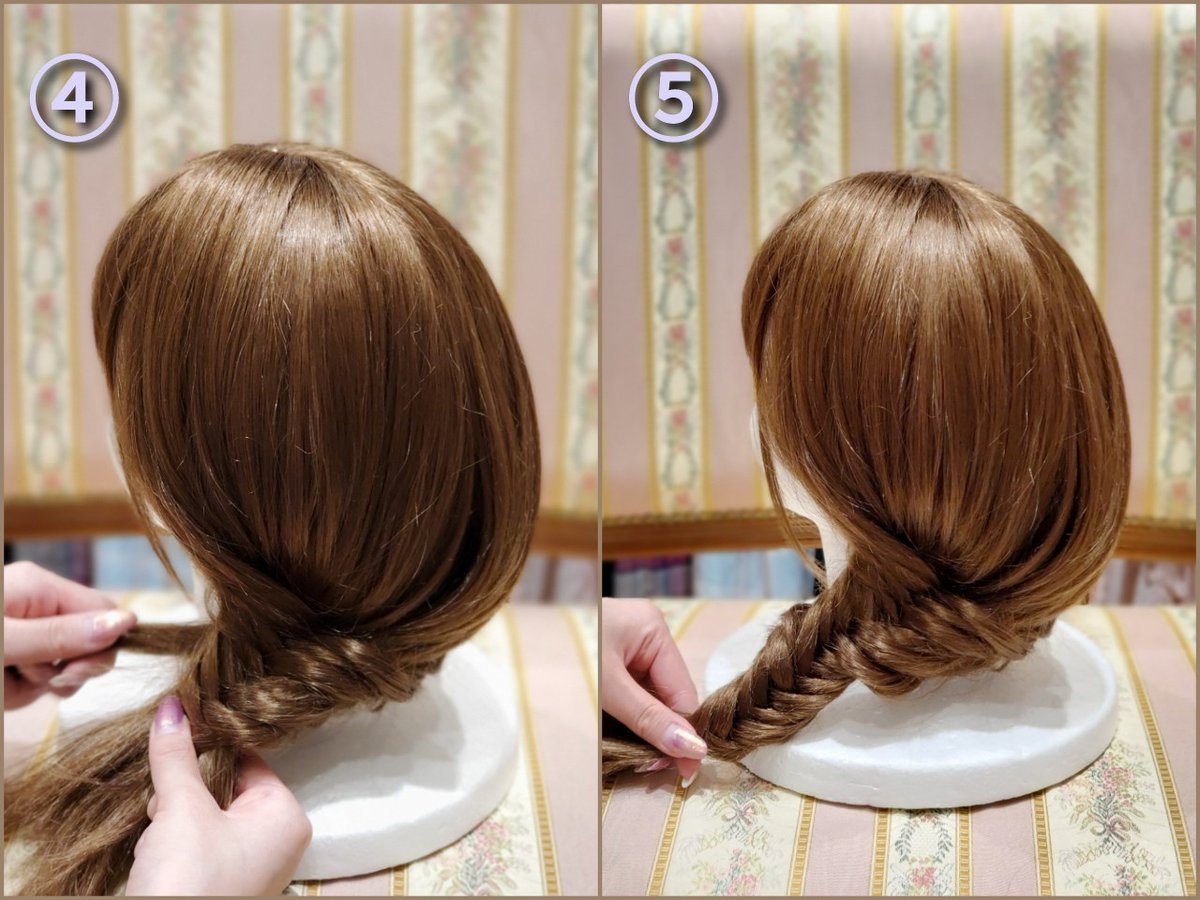
④ ②、③を繰り返す
⑤バランスを見てほぐし、ゴムでとめる
⑥カチューシャを付けて完成
Surprisingly easy once you learn it
Introducing the side fishbone braid
① Gather hair to one side and divide in half
② Take a little hair bundle on the left and match it with the hair bundle on the right.
③ Similarly, take a little hair bundle on the right and match it with the hair bundle on the left.
④ Repeat ② and ③
⑤ Loosen and balance and fasten it with rubber.
⑥ Complete with a head bow
Style #9: Halloween Cat Ear Style
ハロウィンにおすすめ🎃猫耳アレンジのご紹介です🐱
毛先を巻いたり、ツインテールにしても可愛いですよ🍬
①耳上の毛を少しとって緩く結ぶ
②上から下へくるりんぱしぎゅっと絞る
③捻れた部分を少しずつ引き出しバランスを見ながら耳の形に整える
④リボンをつけて完成🦇
It’s also cute if you curl your hair or add twin tails!
① Remove a little hair above the ear and tie it loosely
② Squeeze tightly from top to bottom
③Pull out the twisted part little by little and arrange it into the shape of the ear while checking the balance.
④ Complete with a ribbon
Style #10: A Classical Hair Arrangement


クラシカルなまとめ髪アレンジをご紹介致します
①ハーフアップに結び、上から下へくるりんぱ
②全体を2つに分け三編み
③くるりんぱの中に三編みを入れる
④毛先をもう一度くるりんぱの中に入れピンで止める
⑤反対も同じように巻き付ける
⑥カチューシャをつけて完成
①Make a ponytail that ties up half-up and then bring the end back through it from top to bottom
② Divide the whole into two and braid
③ Pull a braid through the hole in the ponytail
④ Put the tip of the hair in the pin again and fix it with a pin.
⑤ Wrap the opposite in the same way
⑥ Complete with a head bow
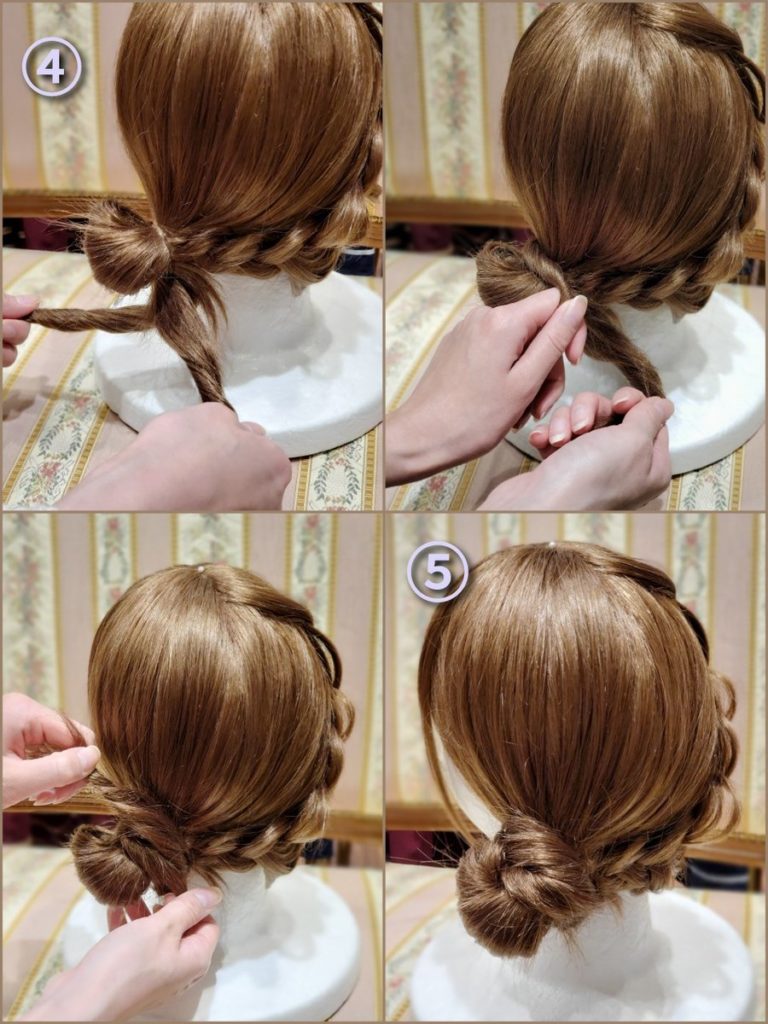
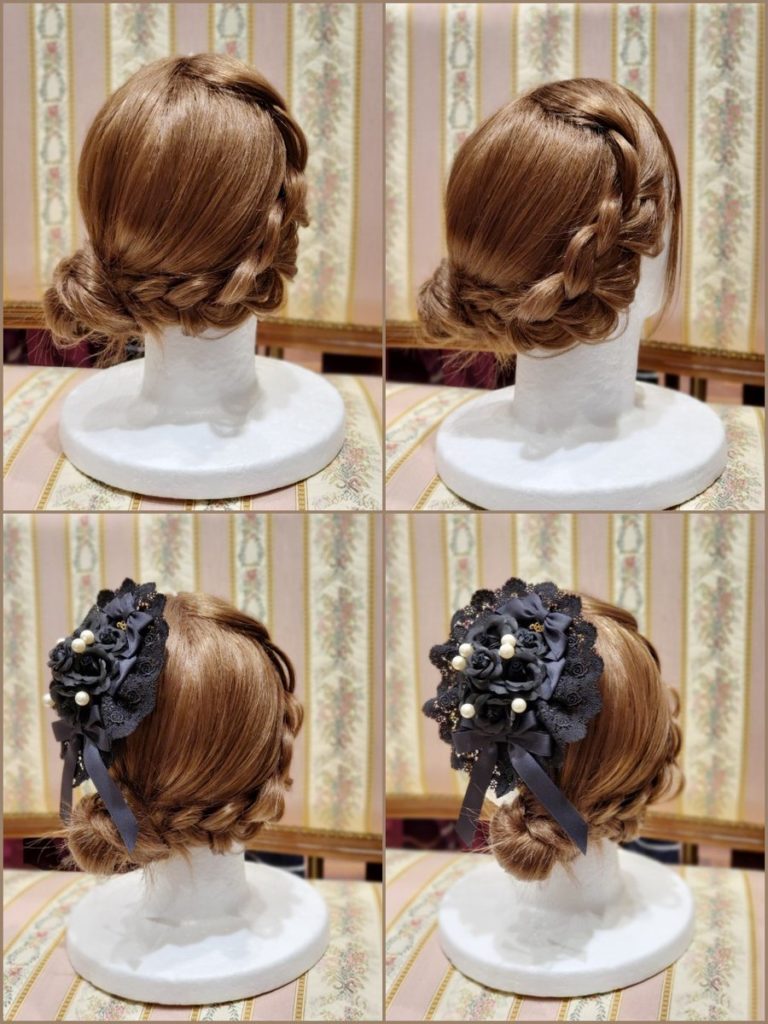
Style #11: An Elegant Updo


①両サイドを残し後ろ髪を少し高めに結ぶ
②上から下へくるりんぱ
③残したサイドの毛束を三編みしピンで留めやすい様に毛先を丸く結ぶ
④ ②の毛束も2つに分け三編みする
⑤ ③の三編みを交差させピンで留める
⑥ ④も同様に留める ⑦カチューシャをつけて完成
① Leave both sides down and tie the back hair a little higher
② Bring the hair through the middle above the hair band coming from top to bottom
③ Braid the remaining side hair bundles and tie the ends round so that they can be easily pinned.
④ Divide the hair bundle of ② into two and braid it.
⑤ Cross the braids of ③ and pin them.
⑥ ④ is also fastened in the same way
⑦ Complete with a headbow
Style #12: Just Wrap Your Hair Around Your Hair


今回は髪を通すだけの簡単まとめ髪アレンジです
①横髪を残しこめかみ辺りの髪をねじりながら後ろで結ぶ
②下の髪を取り①の毛束に上から下に通し引き抜く
③引き抜いた毛束と残りの下の髪を合わせて②と同様に再び通し引き抜く
④下の毛束を結びクリップをつけて完成
This time, it ’s a simple hair arrangement that you just put your hair through itself.
① Leave the face-framing side hair, select a small bundle from each side at the temple and twist the hair before tying it in the back
② Take the lower hair and pull it out through the hair bundle of
① from top to bottom.
③ Put the pulled out hair bundle and the rest of the hair underneath together and pull it out again in the same way as ②.
④ Tie the lower hair bundle and attach a clip to complete
Style #13: Sheepy Little Buns!

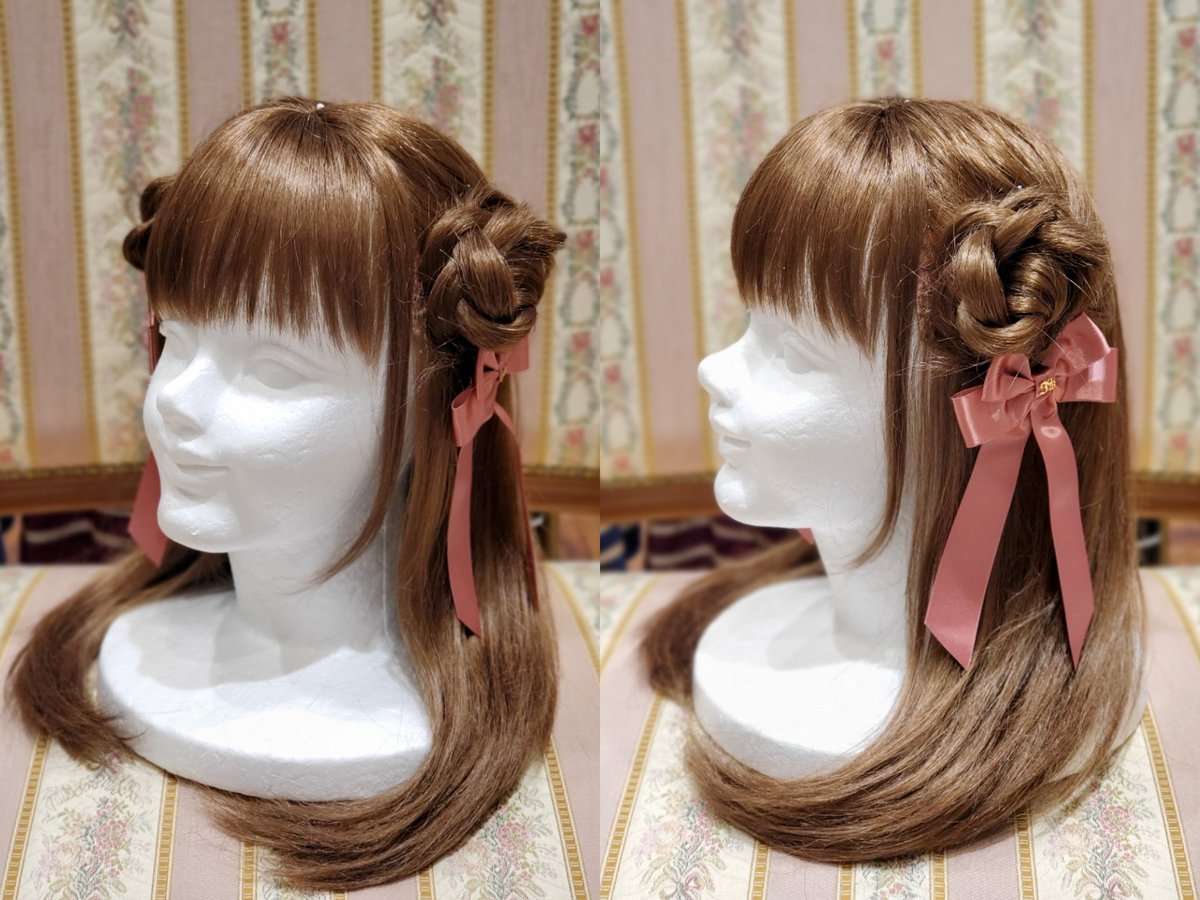

Did IW call this sheepy little buns? No. Am I going to? Absolutely.
三つ編みで作る簡単ひつじさんヘアーをご紹介いたします
①耳上の毛束を少しとり緩く三つ編み
②前から後ろにぐるっと回してピンでとめる
③反対側も同じようにする 緩めに巻くとよりひつじのツノみたいになって可愛いですよ
カチューシャもクリップも相性ぴったり
It’s a simple ram’s horn style made from braids
① Take a little hair bundle on the ear and loosely braid
② Turn it from front to back and pin it to make a bun.
③ Do the same on the other side
If you wind the bun loosely, it will look more like a horn of a ram and it will be cute.
Style #14: Heart-Shaped Look Using a Reverse Twist!


ヘアアレンジのご紹介
逆くるりんぱで意外と簡単
ハートアレンジ
①耳の上辺りの髪を少しとって結ぶ
②下から上へくるりんぱ
③くるりんぱした毛束を2つに分けてそれぞれを三編みし、毛先を1つに合わせて結ぶ
④リボンを付けて完成
使用アイテム サテンパールツインリボンクリップ
A surprisingly easy heart-shaped look using a reverse twist:
① Take a small section of hair above your ear and tie it.
② Twist it from bottom to top.
③ Divide the twisted hair into two sections, braid each section, and join the ends together to form a braid. ④ Add a ribbon to finish.
Accessories: Satin pearl twin ribbon clip
Style #15: Grown up Twin Buns


ヘアアレンジのご紹介
大人ロリータさんにも♪ こだわりツインアレンジ
①二つに分けて結びくるりんぱ
②それぞれ三編み
③三編みの先をくるりんぱの中に通しピンで止める 髪の長い方は余った毛を根元に巻き付けると◎ 帽子をかぶって完成
使用アイテム サテンフリルリボンローズハット
Perfect for grown-up Lolita styles♪
A special twin-tails arrangement💐
① Divide the hair into two sections and tie them together for a twist.
② Braid each section
③ Pass the end of the braid through the twist and secure with a pin.
If you have long hair, wrap the remaining hair around the roots. ◎
Put on a hat and you’re done!
Accessories Used: Satin Frill Ribbon Rose Hat
Again, 100% of the credit for these goes to Innocent World, and this is likely only a portion of the tutorials they posted. I would really love to see them publish a book with all of them! I would buy it for sure!
This is such an awesome resource, thank you for saving, sharing and translating!
this is some great inspiration for hairstyles. i like the simple ones #3 and #5 especially.
thank you for archiving these for future lolitas!
Thank you so much for compiling these! I decided to take the challenge and checked every single tweet saved for the account available on the internet archive. (it took 3 hours!) I found all of yours, plus these two!
https://web.archive.org/web/20200906084006/https://twitter.com/iw_shinjuku/status/1302526913806626816
https://web.archive.org/web/20210408063012/https://twitter.com/iw_shinjuku/status/1380045215273115650
I would really love if you added the missing ones! I love getting back to this article for a nice compiled list.
Ah! That’s fantastic!!! I was sad the heart one was lost because I had wanted to try it! I’ve added them to the end! Thank you so much!!!!!